


STRONG Electric Roller Blinds - Installing a SOMFY Sonesse 40 Motor
If you have a STRONG Roller Blind and need to install a fresh SOMFY Sonesse 40 WT (Relay) or RTS (Radio) operated motor, this post will talk you through the parts involved and the process.
You may need to carry out this process for the following reasons:
- You are upgrading from chain to motorised operation.
- You are switching from one motor type to another.
- You have received a replacement motor due to fault or damage.
You may also wish to use these instructions as a guide to ensure that your existing SOMFY Sonesse 40 motor is correctly installed in the tube. We sometimes find that motors, or the motor collar or drive-wheel can become disengaged from the neck of the motor during installation or in transit.
If the motor is not inserted correctly, this can lead to "wobble", vibration, or noise during operation. This video will explain the correct fitment, which should eliminate these issues.
The motor assembly
Firstly, which parts will you be removing (and/or inserting) into the roller blind tube?
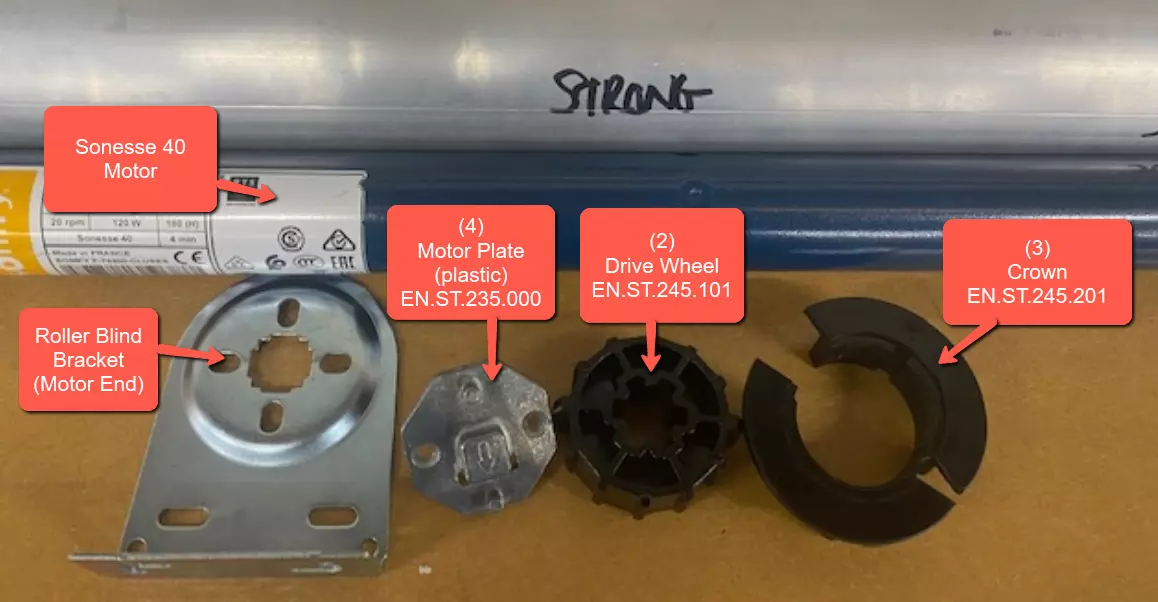
- Sonesse 40 RTS or Sonesse 40 WT Motor: This is the motor itself - made up of the motor-head (black end with cable), the shaft (blue) and the drive (yellow end).
- Drive Wheel - Part Number EN.ST.245.101: This clicks in place onto the yellow drive. It is designed to fit snugly into the profiled shape of the roller tube and when driven by the motor rotates the roller blind tube.
- Crown - Part Number EN.ST.245.201: The crown is sometimes referred to as the collar. This fits around the neck of the motor, next to the motor head. It locates into the neck of the roller blind tube.
- Motor Plate (plastic) - Part Number EN.ST.235.000: this is screwed in place onto the end of the motor head and allows the blind to be secured into the roller blind bracket.
- Roller Blind Brackets - the one shown is the motor-end bracket into which the motor plate locates. There is also an idle end bracket. These will be screw fixed into your window recess or wall
Depending on the circumstances, the crown, drive and motor plate may already be fitted to the motor. Or they may be provided separately as depicted below.
Removing the motor from the tube
Firstly, it's important to note that our motors are not pinned into the tube using screws or rivets. So, if you need to remove an existing motor for replacement or re-seating, they can be easily removed by taking hold of the motor-head (next to the cable) and carefully pulling the motor out of the neck of the roller tube.
It is very important that when removing the motor you always keep the motor level in-line with the tube. Pulling the motor out of the tube at an angle can damage the motor.
Adding the crown to the motor
One of the most important things when inserting a motor is into the roller tube is ensuring that the crown is fitted correctly to the motor. Incorrect fitting of the crown can cause noise, vibration or jogging of the blind during operation. Worse case - if it's fitted incorrectly, a radio operated blind in particular may not operate correctly.
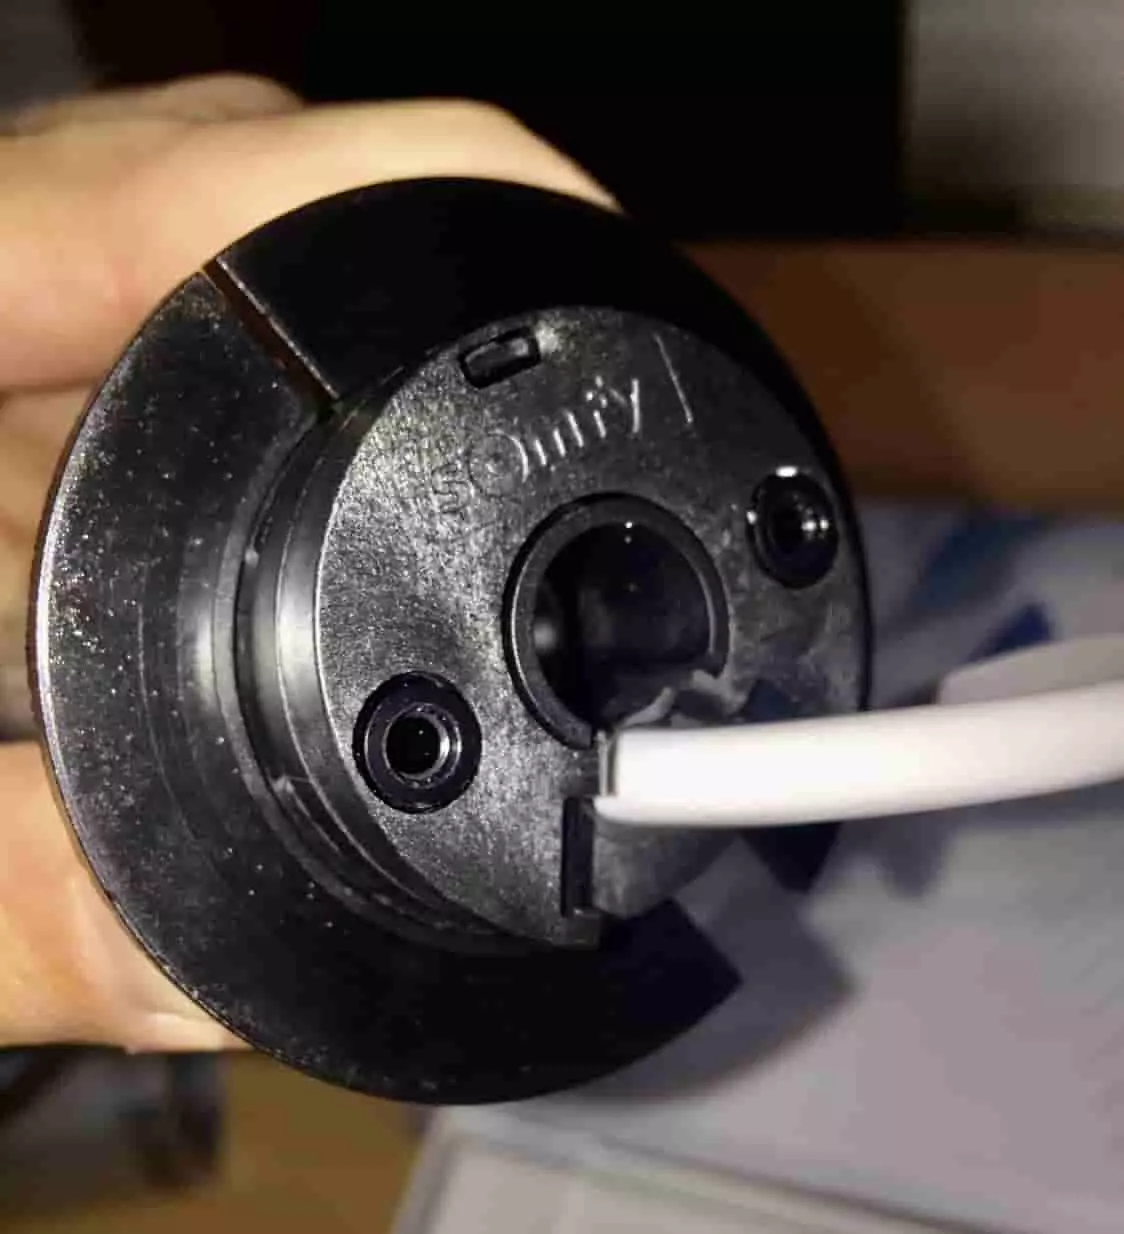
Before fitting the crown to the motor, let's have a look at the motor itself. As you can see from the video above, the neck of the motor features a ring that can freely rotate. On this ring is a rectangular tab. This tab contains a magnetic "counter". For radio (RTS) operated motors, in particular, this magnetic "counter" is extremely important in that the motor itself counts the number of times this counter rotates and uses this information to regulate the position of the motor. When you set the upper and lower limits, the magnetic counter is key to the motor being able to operate between these limits.
You will see that there is a corresponding "notch" on the inside of the crown (see image below). It is important that when the crown is fitted to the neck of the motor, that the magnetic counter sits precisely in this notch.

Once fitted to the motor neck, with the counter positioned in the notch, the crown should be squeezed closed, as per the photo below. The flat part of the ring should be facing outwards towards the motor-head and cable, with the grooves facing towards the shaft of the motor.
Please note that from when you first add the crown to the neck of the motor (ensuring that the magnetic counter is correctly located) to where the crown is securely inserted into the roller tube, there is a lot of potential movement. As you go through this process, please keep checking that the magnetic counter is still in the correct position in the notched out section of the crown. Remember that this counter effectively tells the motor the current blind position. So if the counter is not located correctly and doesn't spin at the same rate as the drive wheel it can be impossible to set and retain the upper and lower limits of the blind.
Adding the drive wheel to the motor
You will see that the drive wheel has a star-shaped hole in the centre which matches up to the shape of the yellow drive on the end of the motor. The drive wheel is simply pushed onto the yellow drive end and will locate securely with a nice click. You'll see that once the drive wheel clicks in place, the end of the yellow drive pokes through the drive wheel. If you need to remove the drive wheel for whatever reason in future, you will need to squeeze the part of the yellow drive wheel that is poking out, to release the drive wheel.
Attaching the motor plate to the motor
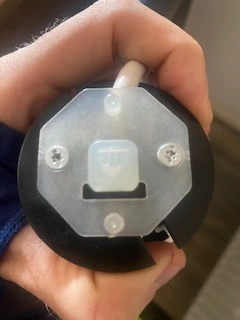
If your motor doesn't have the motor plate already attached, you will also need to put this in place. As you can see from the image below, the motor plate is fixed to the head of the motor using two small screws. In the centre of the motor plate is a square-ended hook, which locates into the motor bracket when the blind is being installed. You'll see from the photo that the square face of this hook has an arrow embossed on it. This arrow is intended to indicate that the motor plate should always be installed with this arrow pointing downwards. You'll note from the photo, that we have positioned the cable so that it will be pointing upwards. In most installations, the power cable needs to be positioned as such, so that the cable can be connected to a power supply above it. However, if you would prefer your cable to be pointing downwards, you can always remove the motor plate and fix it on the other way around.
Inserting the motor into the roller blind tube
So, far we have taken time to ensure that the motor plate, the crown and the drive wheel are correctly installed to the motor. Once you have done this, we need to insert the whole motor assembly into the roller tube.
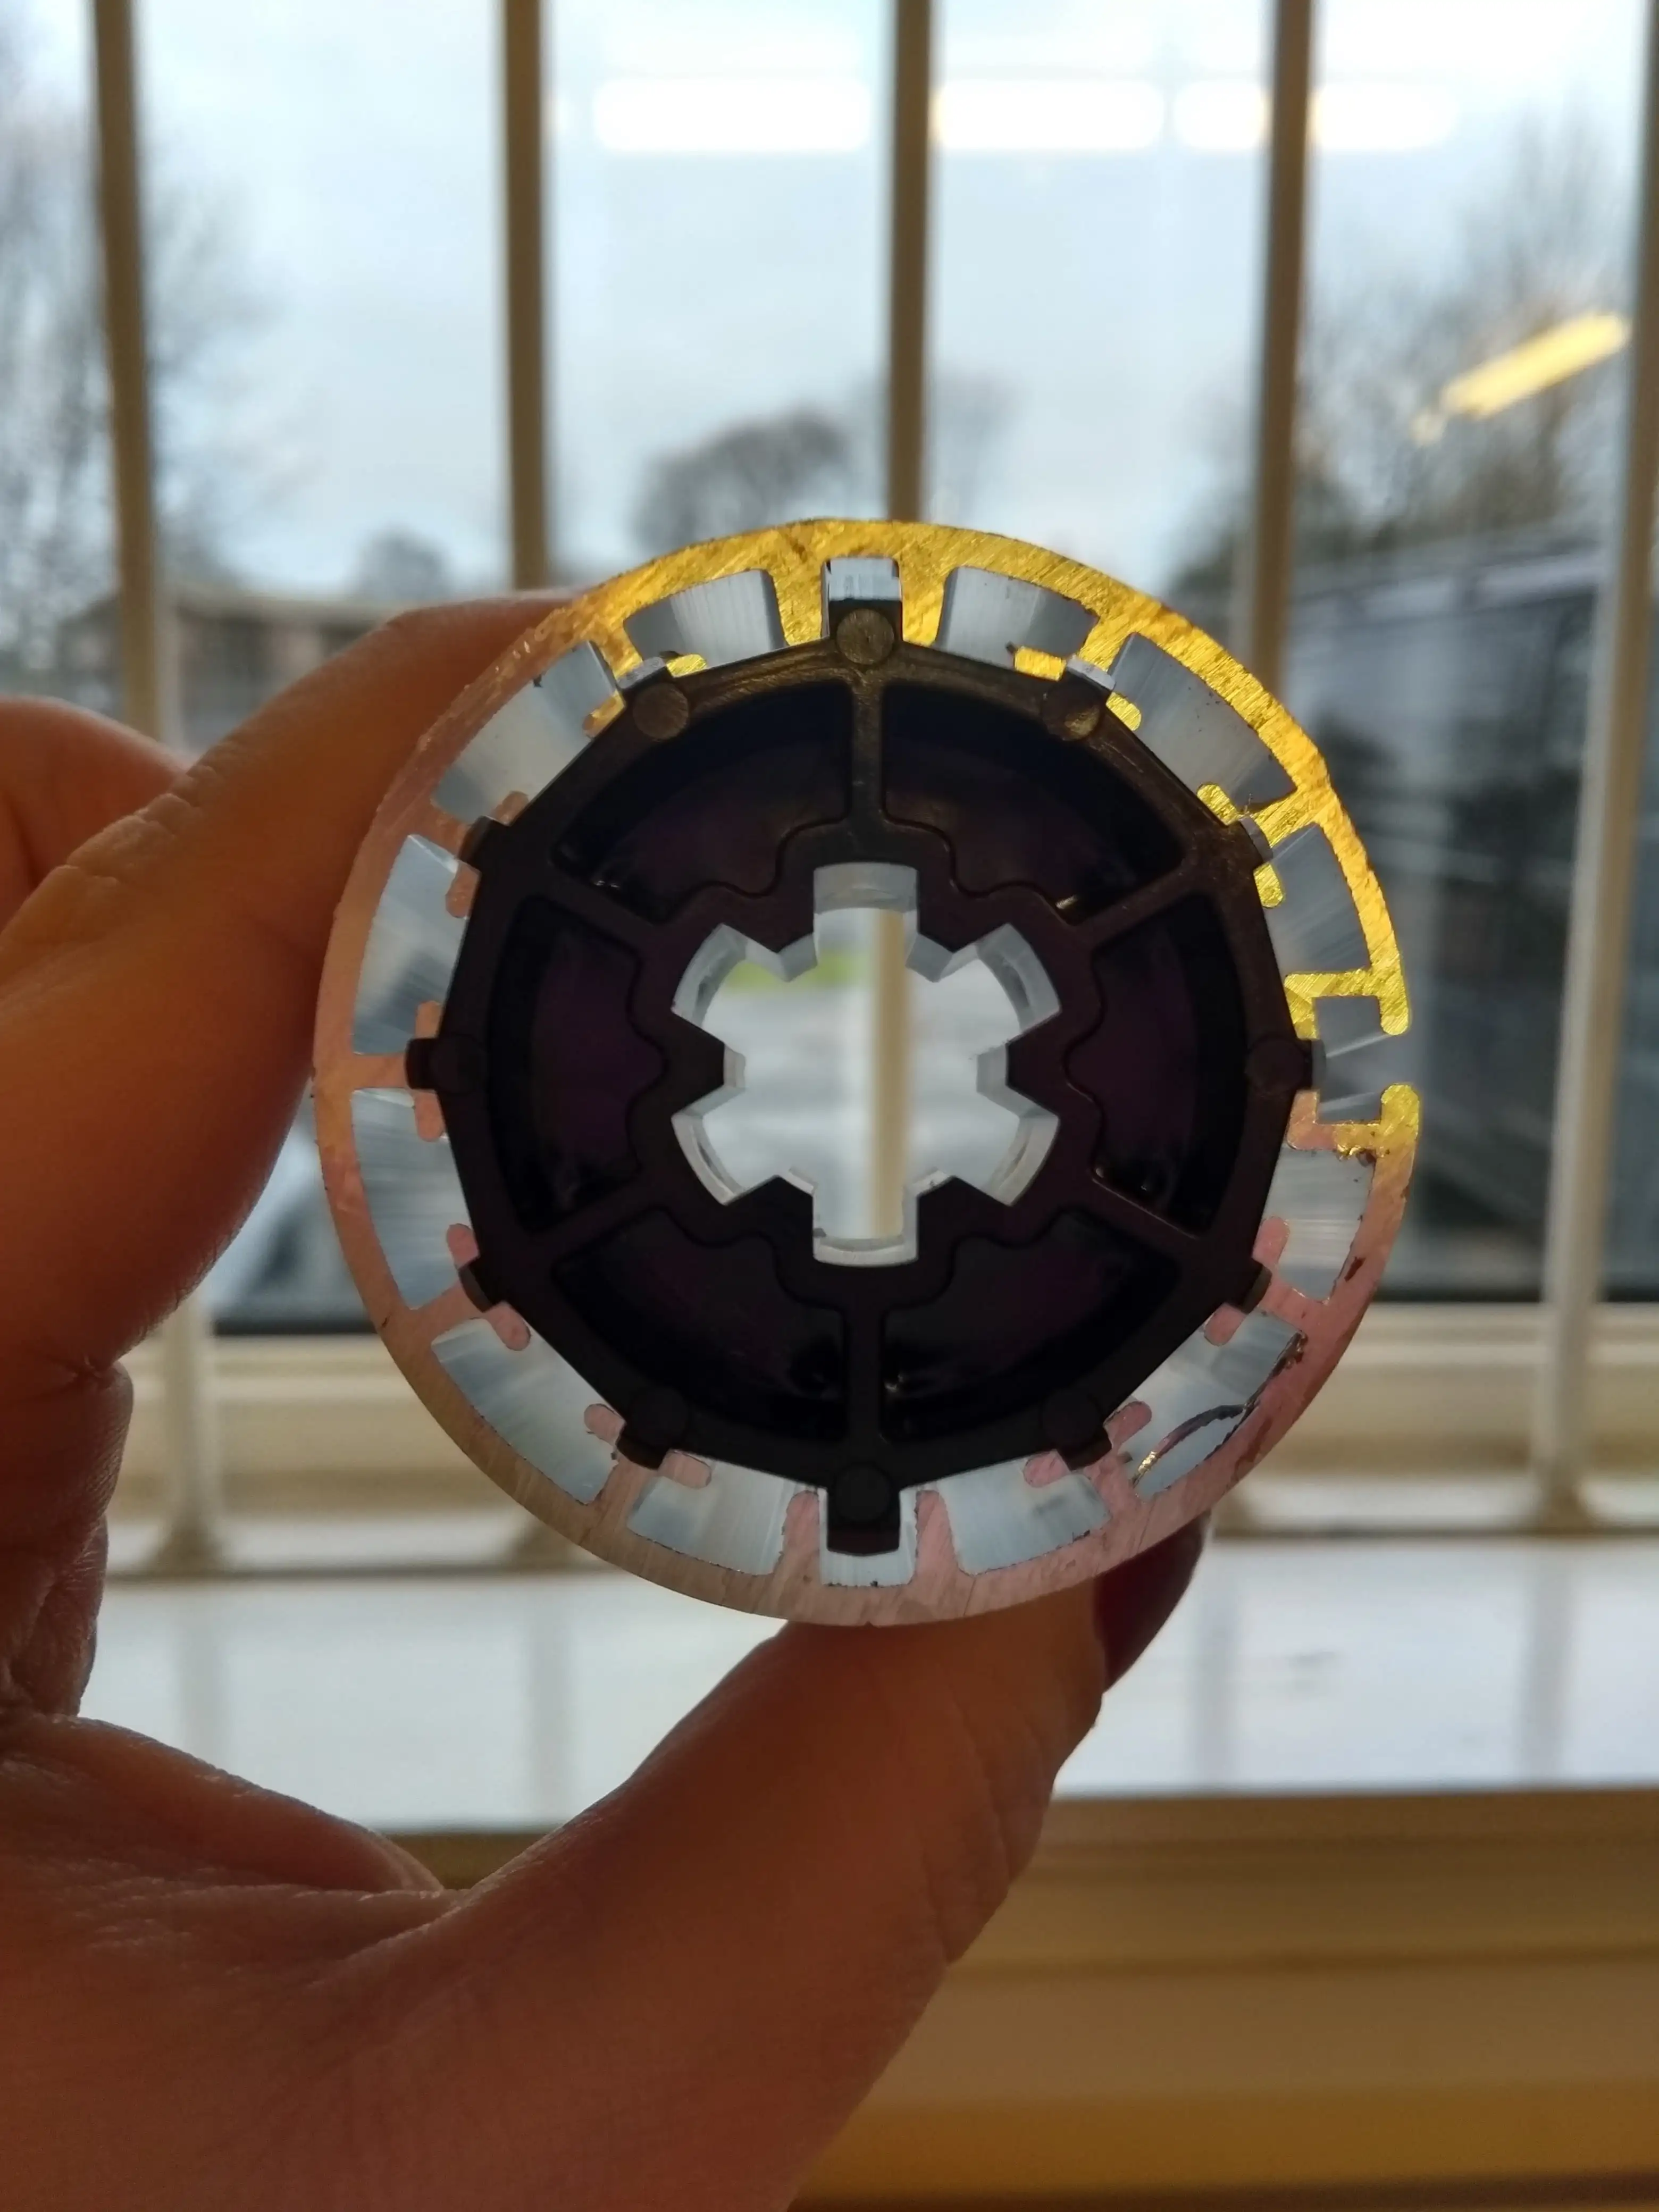
First, you will need to locate the drive wheel into the roller tube. In the image below, we show the drive wheel in the tube without the motor, for simplicity. You can see that the drive wheel has "teeth" around the circumference - including two larger teeth directly opposite each other. On the inside of the tube itself, we have two rectangular slots that match up to the teeth on the drive wheel. You will need to insert the motor, drive-wheel first, into the roller tube so the two large teeth are located in the rectangular slots, as per the photo below.
Once the drive wheel is located correctly in the roller tube you will need to insert the rest of the motor assembly. The last part of the assembly that will need to be correctly located is the crown. Remember, earlier in our instructions we mentioned that the magnetic counter on the neck of the motor needs to remain located in the notch within the crown. You can ensure this by squeezing the crown closed. There is a split in the ring of the crown itself which enables some flexibility when adding the crown onto the motor, but it does tend to spring open unless held closed.
In the image below, again shown without the motor for simplicity, you'll see that the reverse side of the crown (the side which will slot into the roller tube) has teeth around the circumference, which are intended to securely locate into the grooves on the side of the roller tube. As with the drive wheel, there are two larger teeth directly opposite each other. These larger teeth locate into the rectangular slots on the inside of the roller tube.
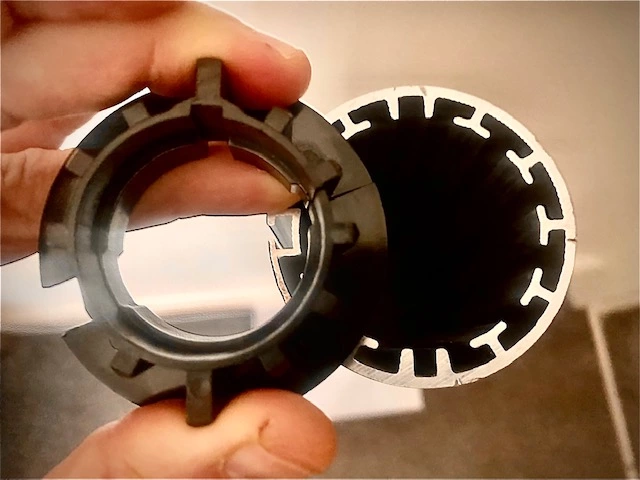
So, keeping the crown ring squeezed closed around the neck of the motor, insert the grooved side of the crown into the roller tube so that the big teeth locate into the rectangular grooves.
And that's it!
You've successfully installed a SOMFY Sonesse 40 motor into a STRONG 61mm diameter motorised roller blind tube. Next step is to hang the blind in the roller blind brackets. After carefully installing the motor assembly, be careful that when manoeuvring the blind into the fixing brackets that the crown and motor do not slip out of the roller tube!
Newblinds.co.uk offer a wide range of electric blinds for which can be operated with simple handsets, mobile app, voice assistant or integrated with Smart Home Systems of BMS. Please don't hesitate to reach out to us for advice when considering your purchase or for post-purchase support!