


Perfect Fit Blinds - Measuring & Installation Instructions
We have the following video instructions for measuring and installation of Perfect Fit Blinds.
- Perfect Fit Pleated Blinds - Video Instructions
- Perfect Fit Venetian Blinds - Video Instructions
- Perfect Fit Roller Blinds - Video Instructions
We'd also suggest reading our written measuring and installation instructions, below.
HELPFUL TIP: If you are unsure whether Perfect Fit is suitable for your windows - we can help you in the following ways:
- Take a photograph of your window frame and email it to us at [email protected]. We will look at it and respond with any appropriate comments and guidance.
- Order a sample of Perfect Fit frame frame and brackets.
<< Go Back to Browse Perfect Fit Range
How to Measure Perfect Fit Blinds?
Step 1: Are Perfect Fit Blinds Suitable for Your Window?First you will need to find out whether perfect fit blind is suitable for the frame of your conservatory, window or door. The brackets which will secure your blind in place are only compatible with internally beaded PVCu window frames, which have been sealed with glazing gasket. Most modern windows are internally beaded, due to safety legislation. However, glazing tape is often used by rather than glazing gasket as it's cheaper for the window or conservatory manufacturer. Please Note: If your beading surround width is greater than 26mm then the Perfect fit Frame may not cover your beading completely and it may not sit flush on your window frame. Unfortunately, if your window is externally beaded or sealed with glazing tape, then it will not be possible to install Perfect Fit Blinds. |
|
|
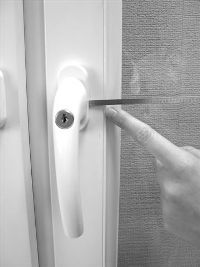
Step 2: Check for Obstructing Handles.Measure if there is a 27mm clearance all around the frame of the window frame, especially where there is a handle. TIPS:
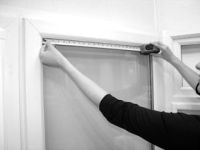
Step 3: Measure the GLASS SIZE in mm.
To do this, measure the actual visible glass WIDTH and DROP as accurately as possible.
TIP: We recommend using a digital measuring tape if possible and to measure in both corners and the centre of the window and use the smallest measurement in each direction. |
|
|
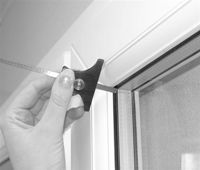
Step 4: Measure the WINDOW FRAME DEPTH in mm.To do this, we recommend using a Depth Gauge. This gives a measurement from the glass to the face of the window frame where the clip-in brackets will be fitted. |
|
|
Based on the WINDOW FRAME DEPTH that you provide, we will select the appropriate bracket size, as follows:
|
|
<< Go Back to Browse Perfect Fit Range
How to Install Perfect Fit Blinds?
We will supply a kit for each window pane that you have provided measurements for, including the required number of brackets of the appropriate height. (Note: these brackets can be exchanged if incorrectly specified.)
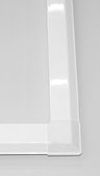
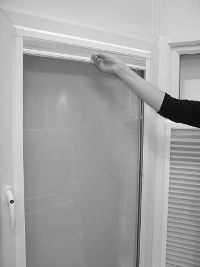
Step 1: Unwrap Your BlindCarefully unwrap the parcel, taking great care not to cut any of the cords, if using scissors or a knife. Lay out the frame on it's front face, with the closed blind at the top. |
|
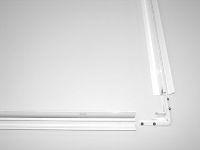
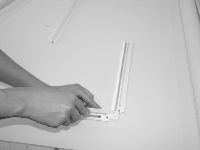
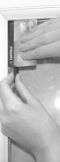
Step 2: Fit Corner JointsSlide each Corner Joint into the Vertical and Horizontal frame pieces to create a rectangular frame. Do this by pushing the protrusions into the groove in the aluminium lengths until they are fully inserted. Then tighten the small screws to secure all four corners in place. Make sure you do not trap any loose cords whilst doing this. |
|
|
|
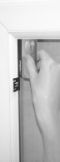
Step 4: Fit Brackets to your WindowUse a credit card or the measuring card provided.
Place the card in the top left hand corner of the visible glass area to find the correct position to install the 1st bracket.
At the bottom edge of the card, slide one of the brackets under the glazing gasket until is tight up against the bead.
TIP: Light lubrication with washing-up liquid may make this easier in some cases
Repeat in all four corners of the window pane.
This will ensure alignment with the holes in the frame members. (Note: in extra tall or extra wide windows, additional brackets may be necessary in intermediate positions, and will be automatically supplied) |
|
|
Whether you want to fit the blinds to UPVC window frame or are facing problems with installing perfect fit venetian blinds, these blinds instructions are sure to help you install your blinds. Yes, it really is that easy ! |
<< Go Back to Browse Perfect Fit Range
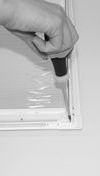
How to remove Perfect Fit Blinds for cleaning and replacement?
Step 1: Raise the Blind
To remove your blind for cleaning or replacement, raise the blind to the open position. |
 |
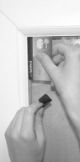
Step 2: Release the Frame from the Brackets
Simply prise the clip out of each hole one at a time, using a flat-blade screwdriver and remove the Perfect Fit Frame, leaving the clips in place.
Yes, that is easy, too ! |
.jpg) 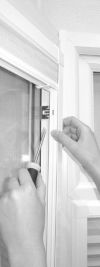 |
We are determined to make it easy for you to understand how to fit blinds to windows. If you have any questions about any of the steps in this process, please email [email protected]. Our offices are open Monday-Friday from 9am - 5pm.
Frequently Asked Questions
Can I get perfect fit blinds for my bathroom UPVC window?
Yes, you can get perfect fit blinds for your bathroom UPVC window. Perfect fit blinds are made to the exact measurements of your window’s glass pane, so they will fit perfectly and provide you with the privacy and light control you need.
Can I fit perfect fit roller blinds to a bathroom UPVC window?
Yes, you can fit perfect fit roller blinds to a bathroom UPVC window. Perfect Fit roller blinds are a type of roller blind that is designed fit the exact glass size of your window. It is installed with clever brackets which slide between the glass and the rubber gasket underneath the beading of your window frame. There is no need for drilling or screwing - the blind simply clip fits to these brackets. We’d suggest choosing a PVC moisture resistant fabric for use within a bathroom.
How do I measure for quick fit blinds?
To measure for these quick fit blinds, you will need to measure the visible glass size of each window pane to which you’d like to install perfect fit blinds, and the depth of the window beading from glass to face of frame. Step-by-step measuring instruction videos can be found on the product page for each type of perfect fit blind.
How do I measure for white plantation shutters?
To measure for no drill Perfect Fit white plantation shutters, you will need to measure the width and height of the visible glass each pane that you wish to install the shutters to. You will also need to measure the bead depth which is the distance from the glass to the face of the frame. Full step-by-step video instructions are available on the product page.
Are there door blinds with no drilling available?
Yes, there are door blinds that can be installed without drilling. These are called Perfect Fit blinds. They use brackets that slides under the beading of your door frame. The perfect fit frame and blind are mounted onto these brackets.
How can I accurately measure and install my perfect fit blinds?
Measuring and installing your perfect fit blinds is straightforward with our step-by-step Perfect Fit Blinds Measuring Installation Instructions. We require the visible glass width,drop and bead depth. To measure the bead depth, place a credit card over the corner of the window frame and measure the void from the glass to the card - this depth determines the bracket projection required for a perfect snug fit to your window.
Can I fit blinds to uPVC windows using the Perfect Fit installation instructions?
Yes, the Perfect Fit installation instructions are particularly designed to help you fit blinds to uPVC windows. With the innovative perfect-fit frame system, you can easily clip the blinds into place without the need for drilling or screws. This makes Perfect Fit blinds a perfect choice for uPVC windows. All you need to do is accurately measure the window for a smooth installation process.
Can I install the Perfect Fit blinds on my own without drilling?
Yes, absolutely! In fact, Perfect Fit Blinds are designed for effortless installation. When you choose our no drill Perfect fit roller blinds, you can install them without the need for tools or professional help. All you need to do is push the brackets under the rubber seal/beading around the edge of the window or door and clip the blinds onto the brackets. This process is not only easy but also causes no damage to your windows or walls. Clear instructions are provided with every order to ensure a successful installation.
Can I install INTU screw-fit blinds on my wooden windows?
Yes, INTU screw-fit blinds for wooden windows are designed as an alternative to the bead-fit design. We do not have the screw-fit version on our site but can get these, if you contact customer services we will be more than happy to advise you and get the screw-fit version details for you.
Where can I find perfect fit blinds measuring installation instructions?
Detailed perfect fit blinds measuring and installation instructions are provided on our website, ensuring that you can perfectly fit your blinds with minimal hassle. If you're looking for specific instructions on Velux Blinds UK, we also have step-by-step guides to assist you with the process. Get in touch with our customer service team if you need any extra help or guidance. We're always here to help.
Can I install Perfect fit wooden blinds on my Bay window?
Our Perfect Fit Blinds system is designed to fit UPVC windows and will work with most windows, including bay windows. The system allows for easy installation without drilling or screwing into your window frames. Venetians are perfect for creating the perfect privacy and shade for your room.
I have small windows in my kitchen. Can I use perfect fit blinds for them?
The beauty of perfect fit blinds is that they can be tailored to fit any window size and style, including small kitchen window blinds. As they can be installed directly to the window without drilling or screwing, they leave your window sills and worktops clear. All you need to do is accurately measure the glass size of your window, select your preferred style and colour, make your order, and follow our detailed installation instructions to fit them into your kitchen window. You’ll have a more stylish and functional kitchen in no time!